Hard sync and reset to any phase

syurin
syurin Member Posts: 10 Member
edited October 2024 in Building With Reaktor

Nice to meet everyone.

I'm new to REAKTOR, I enjoy making original synthesizers and more.

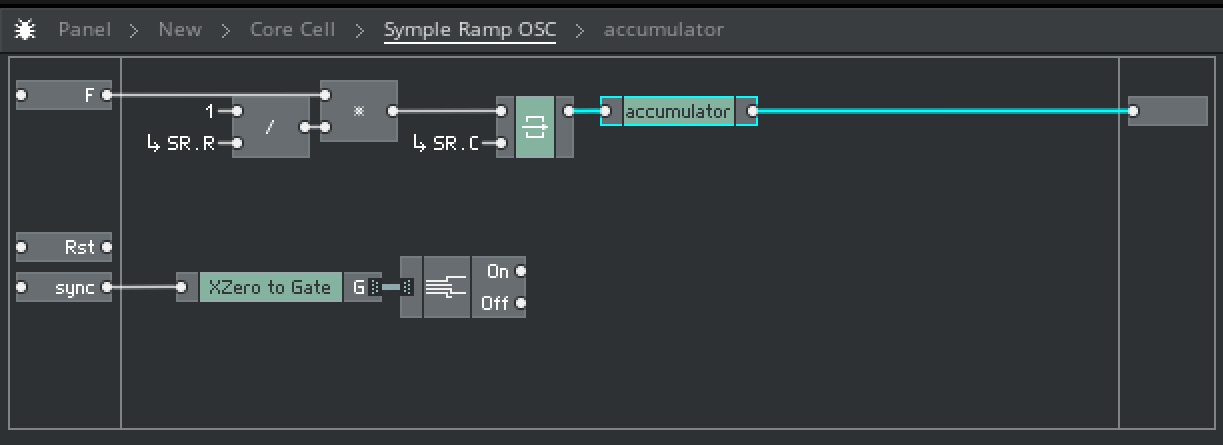
I made a simple Ramp wave oscillator with Core Cell.

I would like to add a hard sync and the ability to change the start position of the wave to that oscillator.

I tried various things, but I couldn't do it well. The current structure is a simple accumulator.

I would be grateful if you could tell me how to modify it.

The image is the module I connected.

Please tell me what and how you need to connect. Module to add

thank you.


P.S

I don't speak English as my mother tongue, so the sentences may be strange.

A sincere apology.

Tagged:

Comments

  • bolabo
    bolabo Member Posts: 97 Advisor
    edited March 2022

    You just need to add another 'write' module to reset the accumulator from your sync signal -->

    You will probably get quite a lot of aliasing, so you will need to set Reaktor's oversampling setting to at least 4-times to reduce it.

    (In the screenshot above the read module is clocked from a 'pickup' of the standard 'Sample Rate' distribution bus ("SR.C"), to add this pickup to your structure right-click on the 'read' module's clock input port and then select "Pickup SR.C" from the menu.)

  • syurin
    syurin Member Posts: 10 Member

    to bolabo,

    Thank you for your reply.

    The image is also very easy to understand, and it seems that it can be put into practice immediately.

    I don't know how to oversample, but first I would like to make an instrument using the method you taught me.


    Is there an easy way to do 4x oversampling?

    I would be grateful if you could let me know if possible.


    Sincere thanks.

  • bolabo
    bolabo Member Posts: 97 Advisor

    You can simply oversample the whole ensemble with reaktor's built in oversampling options (menu is in top right corner of the window):


  • syurin
    syurin Member Posts: 10 Member

    to bolabo

    Thank you for your polite reply despite the rudimentary question.

    I will try it immediately.

    Sincere thanks.🙇

  • Studiowaves
    Studiowaves Member Posts: 648 Pro
    edited April 2022

    Hi Syurin, I know the day will come when you want a ramp instead of an oscillator. Here's an example of a bi directional ramp that can be directed to go either up or down. The up and down speeds are also adjustable, the limits set in the min/max can be changed to any numbers but as shown the ramps go from min to 1 and stops.

    The basic ramp is similar to yours and there is extra stuff in here to do other things. Basically the Sust sets the direction of the ramp. The letter "a" sets the speed of the ramp. The Min Max module sets the limits of the ramp. The Dn is the ramp down speed and Up is the ramp up speed. The S Mode is an override and sets the speed with a value of .05 which reciprocates and ends up as "a". Both S mode and Sust are either 0 or 1. Disregard the MidiV and consider Min your minimum value. As shown there was no need to start at any phase angle, but you can by adding another write module as Bolabo has shown. It's a linear ramp and should be easy to see how it works, but if you have any questions just ask. It's really very simple to understand. Talk Later and have fun.

  • Studiowaves
    Studiowaves Member Posts: 648 Pro

    Balabo, on this You will probably get quite a lot of aliasing, so you will need to set Reaktor's oversampling setting to at least 4-times to reduce it.<<< I don't get this, Please explain!

  • syurin
    syurin Member Posts: 10 Member

    Hi Studiowaves,

    I'm sorry for the late reply.🙇

    Thank you for sharing your valuable knowledge with me.

    I'm not sure if I understand it correctly, but I'll save the photos and screenshots of this thread and study hard.

    REAKTOR is difficult but fun.

    And I'm glad I was able to talk to you.😀

  • Jean louis P
    Jean louis P Member Posts: 8 Member

    Hello

    if it was me , this is what i would try :

    for a good control of the phase after the warp, you should pass your phase in a route module (Greater than 0 ) :

    • keep values above zero ( don't change anything in the upper output , send the signal directly in the merge block)
    • and add + 1.0 to negative values (the lower output of the route )
    • you merge the both ways for the output, with a merge module.

    you make a block with a warp block and this function, called for example "normal warp".

    And you should save this block for other projects, it is always useful.

    This is important for the multiplication of the phase for a linear result. After warp your phase = 0.0, in your program, is the original phase 0.5 ( - 0.5 after warp ). If you do a multiplication on this the result is not what is expected.

    With this block you phase start at the real phase = 0, and you have a continuous sweep of the phase between 0.0 and 1.0.


    Next :

    • you add a multiplication to your phase between 1.0 and 5.0, or 6.0 (for example), with a knob called value "Sync rate". You have a linear phase from 0.0 to your "sync rate" value.
    • You add a "phase shift" value between 0.0 and 1.0 to this phase line.

    You just need your last block , that will normalize the phase ramp between 0.0 and 1.0.

    Then you have your synced phase with phase shift.


    Play with the "sync rate", experiment with the "phase shift" , and you should have what you want.

    You don't need of wasting another oscillator for the sync effect,with this.

    Just add modulation with envelope or LFO on your sync rate for classics osc sync effects.

This discussion has been closed.
Back To Top