This guide will have as an example a simple pre-existing project with 3 groups:
- 🟧 A1 - Only One-Shot samples (Drums)
- 🟨 B2 - 0nly one Sound, an Instrument on Pad-1 (Bass)
- 🟩 C1 - 2 instruments, one on Pad-1 and another on Pad-2. (Keys)
Here is the routed and fully integrated Cubase and Maschine example Project for download in case anyone needs it for anything: Download Link.

Settings in Maschine for 🟧 Drum Group A1
- Open Cubase, create a new Instrument track and select Maschine 2.
- Load example project on Maschine, click the routing button, and use the following settings:
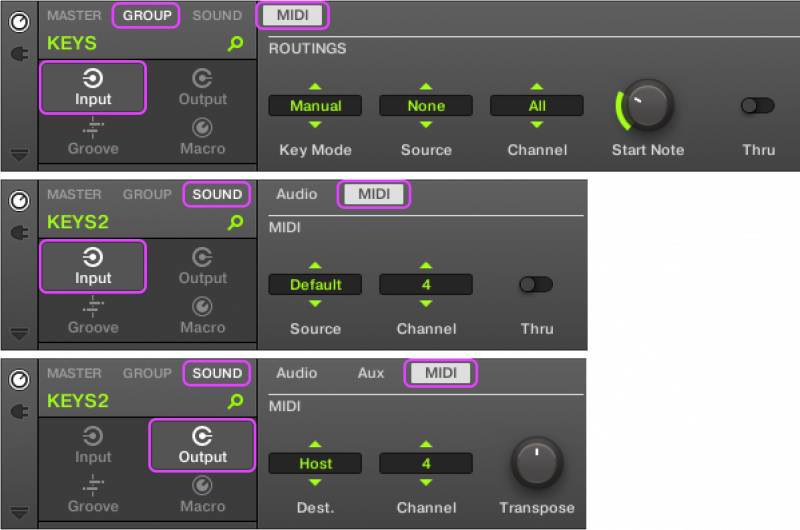
Group MIDI Input settings:
- Set Key Mode to Manual.
- Set Source as None.
- Select Channel 1
- Set Start Note to C3
- Turn off Thru
Sound MIDI Input settings:
- Select all Sounds in the Group (Select one then press CMD+A / CTRL+A)
- Set input Source to Default
- Select Channel 1
- Turn Thru off
Sound MIDI Output settings:
- Make sure all your sounds inside the group are still selected.
- Set Destination to Host
- Select Channel 1
- Don't touch the transpose.
After that's all done your settings should look like this:

Make sure all the sounds inside the group are still selected and right-click the Group and select Group MIDI Batch Setup > Sounds to MIDI notes.
(This will make sure all the sounds inside the Group are triggered by MIDI notes starting on C3 and up)

These will be the default settings for any Group with only samples/one-shots and no instruments, the only thing that needs adjusting based on the project is the MIDI channel you want to use. Do not use MIDI Batch Setup for the instruments!
Settings on Maschine for 🟨 Bass Group B1
Group MIDI Input settings:
- Set Key Mode to Manual.
- Set Source as None.
- Select Channel 2
- Leave the root note alone (we don't need to transpose instruments to C3)
- Turn off Thru
Sound MIDI Input settings:
- Select all sounds in the group (CMD+A on Mac / CTRL+A on Windows)
- Set input Source to Host
- Select Channel 2
- Turn Thru off
Sound MIDI Output settings:
- Make sure all your sounds inside the group are still selected.
- Set Destination to Host
- Select Channel 2
- Don't touch the transpose.
After that's all done your settings should look like this:

- Note: Since this is a Group with only 1 instrument we do not need to use Group MIDI Batch Setup.
Settings on Maschine for 🟩 Keys Group C1
The settings for this group change a little from the previous because it contains more than one instrument, everything is the same with the exception of the Input MIDI channel on each sound, and the Group MIDI input should be ALL. Each Pad/Sound/Instrument in Sound > MIDI-Input needs an exclusive MIDI Channel, in this case, MIDI channels 3 and 4.
Settings should look like this:

If this Group had more instruments instead of just 2 the same logic applies, use all settings from the above picture but just make sure each instrument has its own exclusive midi channel unless you want your DAW to trigger 2 sounds at the same time for some reason, like a layered synth.

Add 4 new MIDI tracks, one for each Group.
Name and color the MIDI tracks to match your Maschine groups (not mandatory but useful for quick reference)

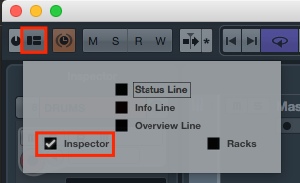
Click the Setup Window Layout button and make sure Inspector is on.
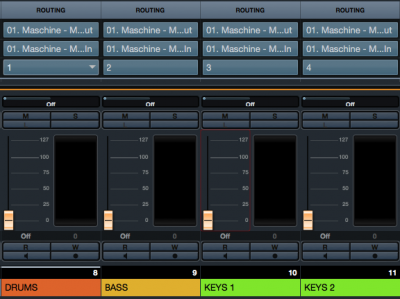
Make sure each Cubase MIDI track has:
- 'Maschine - MIDI Out' as the Input of the Cubase MIDI Track
- 'Maschine - MIDI In' as the Output of the Cubase MIDI Track
- It should look like this for our first group (🟧Drums A1, using MIDI Channel-1)

Confirm that all the Cubase MIDI tracks are using the correct MIDI Channels (Channel-2 For Bass, Channel-3 for Keys1, and Channel-4 for Keys2)
The routing on your Cubase Mixer Rack should look like this:
Transfer the MIDI Patterns from Maschine to Cubase by simply clicking and holding the MIDI button at the top right of the piano roll of each pattern and dragging it to each corresponding Cubase MIDI track.

When you drag the first pattern Cubase creates a bunch of extra MIDI tracks.
NOTE: @backbeat2 explained that in Cubase Preferences > MIDI > MIDI Fille you have an "import dropped File as single Part". Checking this option will avoid the creation of a bunch of extra dummy MIDI tracks.
Create a new scene on Maschine and make sure it's empty (no patterns on it) and selected, press Play on Cubase and you should hear Cubase using the patterns you've transferred and triggering the sounds in Maschine.
Audio Routing (optional):
Now all you need is to set up some Audio Channels.
- On Cubase click the tiny Activate Outputs button on the Maschine Instrument Track inspector and select how many Audio Channels you want.

- In Maschine go to each Sound that you wish to have a separate Audio Channel and select a stereo out. (There's only 16 per Maschine instance so choose wisely, more than one Sound can be routed to the same output)

- Hoover with your mouse in the corner of the Cubase Maschine Instrument Track, a little arrow will appear and show automation lanes for each Audio Track, from there you can open Channel Settings and the usual stuff.

Optional: If you want to keep things tidy open your Cubase Mixer (F3) then press Shift+F2 to display the Mixer Inspector and Hide the MIDI track channels since Volume and Pan don't really work, for that you use the audio tracks you just made.
Your end result should look something like this:
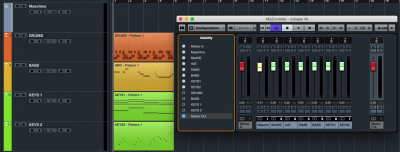
If everything was done correctly you can now record MIDI in Cubase using Maschine's Pads and have it trigger sounds in Maschine.
If you made it this far grab a beer and pat yourself in the back.


![Photo of [Deleted User]](https://community.native-instruments.com/applications/dashboard/design/images/banned.png)