This little Beginner's Guide is for the good people that struggles to implement port images and such for the Euro Reakt 4.3 Blocks Collection by Michael Hetrick (free from the Reaktor User Library) so that you can use his Blocks in Port and Wires View
---------------------------------------------------------------------------------
Disclaimer: I have no affiliation with NI nor Mr. Hetrick, but really recommend to check out his dissertation in the documentation folder and body of work in general (unfilterdaudio.com). You can buy the Euro Reakt 4.3 Wired Version from their Shop. If you want to spare yourself a huge workload, do it. I myself did not, but purchased most of UnfilterdAudio Plugins (via PA), Voltage Modular and VCV modules, yeah yeah i'm kind of a fanboy;)
This Guide is made with Reaktor 6.4.3 and bad English, hehe
---------------------------------------------------------------------------------
Step by Step Guide:
First: make a new ensemble (cntrl + n/ cmd +n), not a rack;)
Second: drag n drop a block from the Euro Reakt 4.3 collection into the ensemble
---------------------------------------------------------------------------------

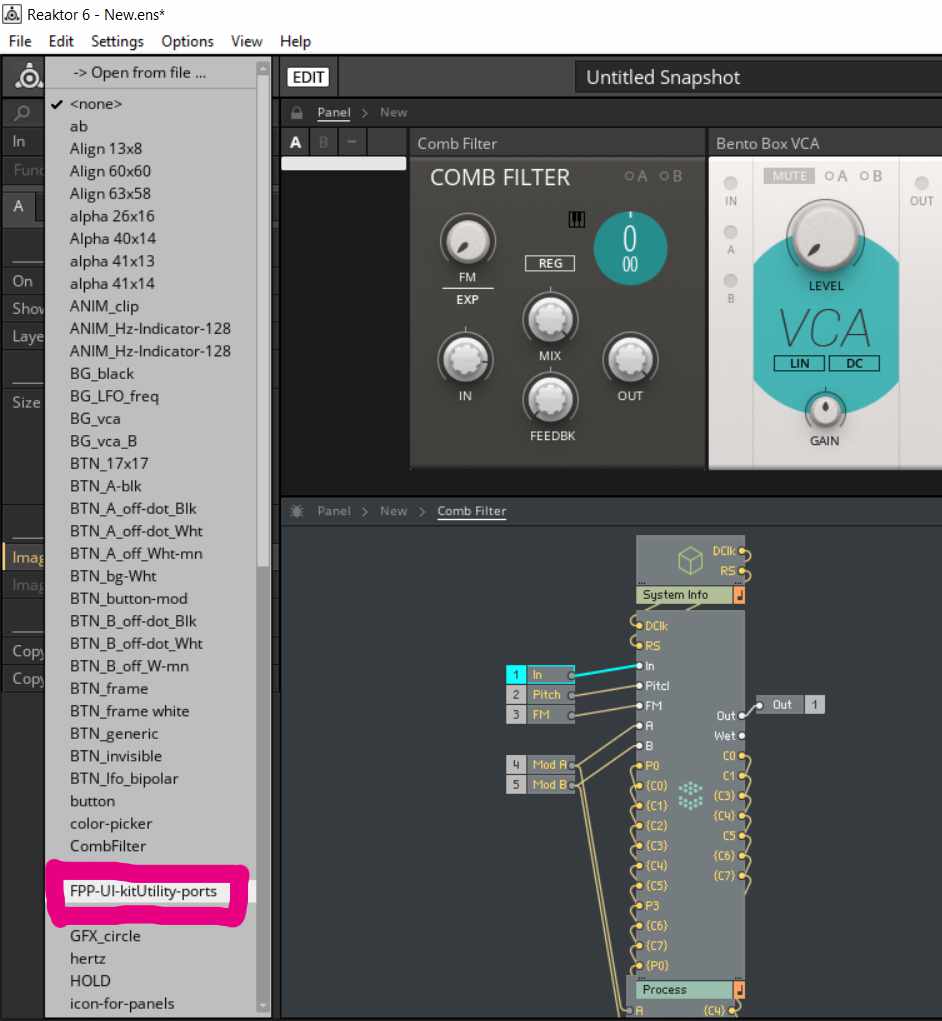
so in this first image , you see where you have to be, be sure to have a control box selected, in this example the "In control box" is highlighted in cyan (look in the structure view)
when you open the image dropdown menu, you have an issue: the port image (FPP-UI-kitUtility-ports) is not available

---------------------------------------------------------------------------------
to fix this, drag and drop a NI Block into the ensemble, and the image becomes available, don't forget to select the "in control box" from the Comb Filter and open the Image dropdown menu
---------------------------------------------------------------------------------

next unlock the panel, make the control visible and hide "show label", now you see this gray dot in the UI (left top corner of the Comb Filter), click on it and drag it with your keyboard arrows to the position of your choice
---------------------------------------------------------------------------------

next generate a text box (press enter in the structure view and write "text" to load a text modul) go to the info tab and write what you want to be displayed, in this case "in", unfortunately i did the screenshot before finishing this step, but you'll see the result in the next image, also i recommend to change the color of the fonts (view tab, choose font color)
---------------------------------------------------------------------------------

repeat all the steps for all i/o , hint: deactivate snap to grid to move fonts and icons in smaller steps, and as second last step, click on th background of the comb filter in the structure view and "Copy A to B", and last step: right click the Comb Filter in Panel View and "Save Instrument as..."


---------------------------------------------------------------------------------
Recap:
- select control (In/Pitch/FM/ModA/ModB/Out, one at a time;)
- choose image : FPP-UI-kitUtility-ports
- unlock panel, visible on, show label off, click on port icon an put it where you want
- generate a text box for each control, go to info panel write the name, click on it in the UI and put it where you want
- Copy A to B
- save your Block as an new Instrument
---------------------------------------------------------------------------------
so to finish this guide, a last image that shows that this works, create a new rack and put some blocks together in port and wires view: you see some output in the top right corner😅

happy patching!!!!

