[Guide] Getting more out of Maschine in FL Studio!

Hi gang!

FL Chan is feeling right at home within Maschine, you go girl! 😎
Editorial
It's been a few weeks (month?) now since someone on Reddit reminded me of FL Studio, one thing led to another and here we are. I can't believe how I could have forgotten all about it and I really feel that I've been missing out big time. What you're looking at above: I added Maschine, loaded my absolute favorite demo project 'Alexanderplatz' from the "Deep Matter" expansion and decided to have some fun by adding the 'Fruity Dancer' effect (= the dancing anime girl "within" the Maschine plugin; she's called FL Chan) and then I added the ZGameEditor visualizer to my master channel, set up a nice animation (a moving mountain background, added some fog and the audio grid) and then left that running.
Insta-dance vibes! This is FUN!
What is FL Studio?
It's a pattern based DAW that's been on the market for over 20 years. It's available for Windows, Mac and even mobile (Android & Apple) and can do some pretty cool stuff. What sets FL Studio apart from the rest is its rather unique ("pattern based") workflow, its build-in tools to process audio, vocals and video effects alike and of course FL Chan! ☺️ Not to mention that it provides a VST plugin that allows you to use FL Studio within any other DAW of your choice if you want to, which is why this has easily become my big #2 DAW next to Ableton Live suite edition.
In this guide however we'll obviously be using FL Studio stand alone.
Playing 'Fruity' generators with Maschine
For those unfamliar with "Fruity references" vsti's are referred to as generators within FL Studio.
As could be expected the quickest and easiest way is to switch your Maschine into MIDI mode which will allow you to play pretty much every generator within FL Studio. With one notable exception:
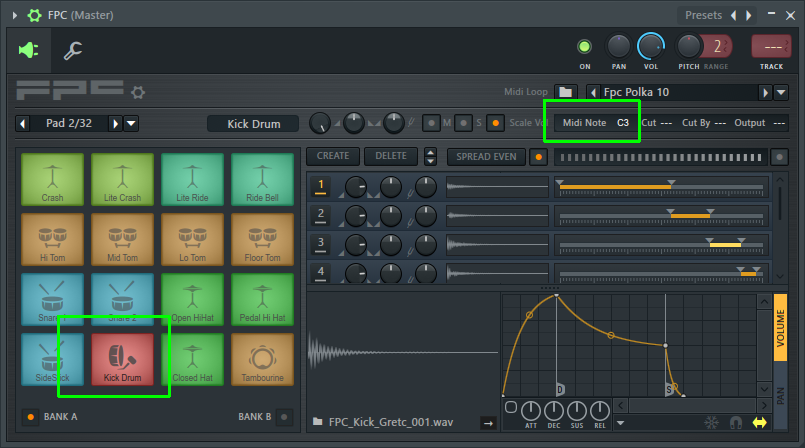
The pads within FPC do not follow a straight note increase. In other words: the kick drum which I highlighted uses C3, but the closed hat next to it responds to F#3 instead of C#3. The snare above it uses D3 vs. E3, and so on. Fortunately this can be easily customized.
But let's take this one step further and ignore MIDI mode...
Setting up routing

Houston, we have a problem! 😮
At first glimpse this looks easy, right? Just set an output port, tell Maschine to sent MIDI back into the host (I'll explain this part in a moment) and we're done! Easy, peasy... right?!

Wait, where's the input port setting?!!
Errr, no, not so easy afterall 🤔 See, those MIDI controls are only available for external VST's, so the above idea would work perfectly if I wanted to use Maschine to play, say, Absynth (kinda unproductive I'd think) or Kairatune (= awesome free dance synth). But as you can see above, the vanilla plugins don't have any of these options, so now what?
Well, so now we're going to start patching! 😎
But first:
- Set the Maschine output port to '2'; you do this by opening the section I've shown above (click the cogwheel in the titlebar if this isn't visible), click the icon highlighted above and then click on the "Output port" option and drag your mouse to set it to '2'.
- Drag a Patcher onto the channel rack:

(in case FL Chan disagrees, maybe try asking nicely? 🤣)
The first time I saw that I laughed my head off, and I still can't help grinning ;)

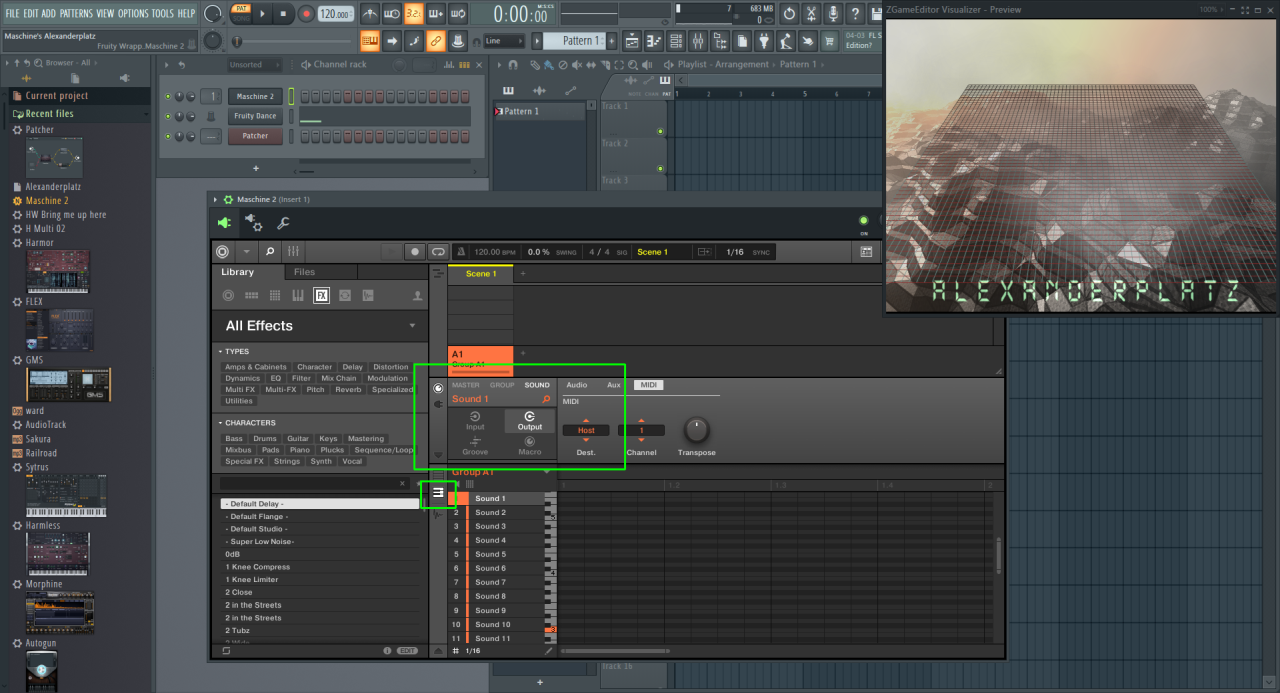
- Now right click on the "From FL Studio" icon and select MIDI channel 2 from the 'events' section (as shown).
- You will now see a second connector appear behind the "From FL Studio" icon; right click on it (so: the bottom round connector).
- Hover over 'Insert plugin' and find "Flex" (under the "Classic synth" header), click on it.
- Double click on the 'Flex' icon to open its interface so that you can customize the settings.
Now it's time to configure Maschine to send back MIDI into FL Studio:
Since we're going to be playing an instrument the quickest way is to set up a sound ("pad") within Maschine and then tell it to sent MIDI back into the host. Using the software is the easiest here: click on the round I/O icon in the middle, make sure that 'Sound' is selected and then open the MIDI section. Change the destination to "Host".
Then enable keyboard mode for this sound, you can either do this by pressing the small (highlighted) keyboard icon below the routing section, or just enable this on Maschine.
Why would you want to do this?
Simple... unlike some other DAW's (like Ableton Live) FL Studio doesn't have any dedicated controllers for it, and while it does support several the focus of many MIDI controllers is still Live. It "works" in others, but not always in the most optimal way.
Using this method though you can play everything you want from behind the Maschine, while also fully utilizing all the features that come with it. For example... playing Sakura (= FL Studio string synthesizer) while setting Maschine's scale mode to "Japanese" can truly bring out some authentic Asian plucked sounds.
And please... don't underestimate FL Studio's potential here either.
Thanks for reading!
In case you want to look into this for yourself: here's the FL Studio project file. You obviously need to have Maschine set up as a plugin, and it needs to have the "Deep Matter" expansion for the best results.
(edit): While double checking it turned out that I had uploaded a wrong copy of the project; one which didn't have all defaults enabled (Fruity Dancer was set invisible, and Maschine didn't have Alexanderplatz loaded; that's fixed! Sorry for any possible confusion).
Comments
-
Well, things have definitely improved for me so lets now focus on something else. In Part I we took a look at how we could use the Maschine controller to play some of FL Studio's ("FLS") native instruments (oh dear... 😄). Now let's take a look at some of the things we can do when we're using Maschine as a beatbox.
Integrating Maschine's sound into FLS

One of the very specific features of FLS is its insane routing capabilities. Here you see the mixer section; it can process up to 125 channels where each channel can also route into another if needed, and of course they all can use up to 10 insert effects (if you need more you can just route one channel into the other one and continue from there).
By default every new plugin will route its audio to the master channel, thus the same applies to Maschine. But what if we want to have more control over the sounds that get generated by Maschine?
Maschine doesn't have to be a blackbox!
See, in my normal workflow I simply use Maschine just like that: I set up all my percussion and optional additional sounds within Maschine and within Live this sits on a single track. So far that works just fine for me.
But what if you need more control over your sounds? For example... that bass drum could be side chained into a compressor to help duck some other sounds. Obviously that's not going to work if Maschine sents all of its material through one output channel.
So let's change that!
Setting up Maschine

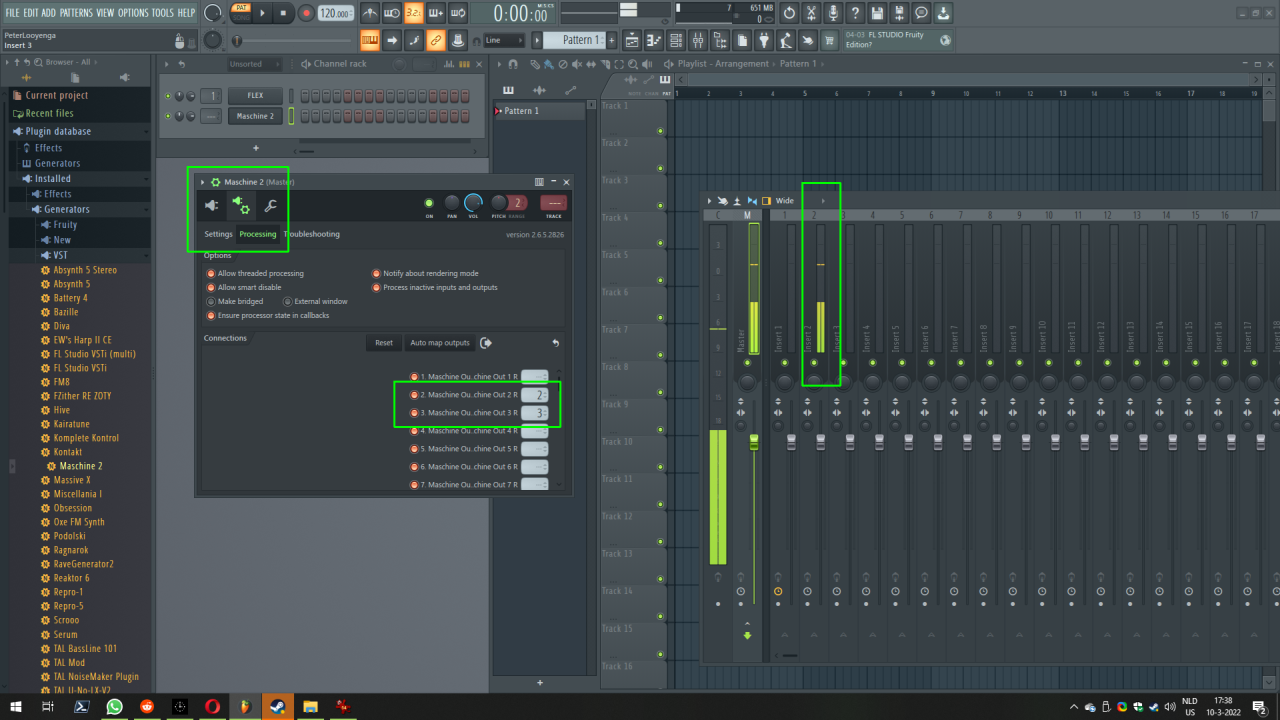
So here I loaded up my favorite 808 kit from the Maschine library, my plan is to send the Kick on pad 1 and the Snare on pad 2 to their own mixer channel so that I can use those sounds for other purposes. As shown above open the
mixer section(edit): audio settings by clicking on the round "dial icon" after which you should see something like the above. Make sure pad 1 (= the kick) is selected and then change its audio destination from "Group" to Ext. 2 (as shown above). Then do the same for pad 2 (= the snare) but this time send it to Ext. 3.So now we told Maschine that it needs to output these sounds directly, these won't be processed by Maschine's master channel anymore.
Setting up FL Studio
(in case you're wondering about the mixer section: I normally have that sitting on my 2nd monitor but moved it for this demonstration)
So first open the VST wrapper settings as shown above by clicking on the cogwheel icon. If this section isn't visible then be sure to click the small cogwheel in the title bar to open it. Then open the "Processing" section where you'll see all audio output channels mentioned. Now it's easy: assign channel 2 with mixer channel 2, then do the same with channel 3.
As you can see in the mixer the kick now sits on a dedicated audio channel (2) and the snare does too, that uses channel 3. So now we can fully control how these sounds will behave by using standard FL Studio insert effects.
This also allows us to set up side chaining for example...
Setting up a sidechain
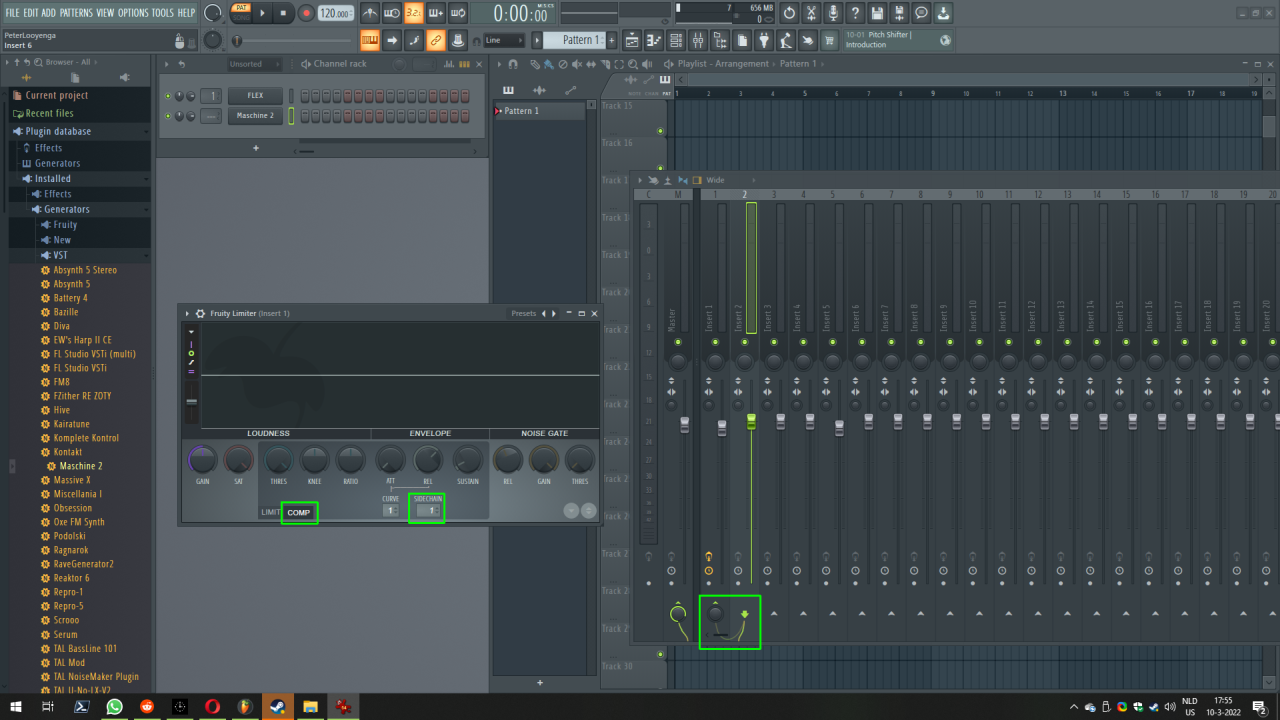
So... Flex, which is my melodic instrument, sends its audio to mixer channel 1. In addition we've dedicated channels 2 and 3 for Maschine's kick and snare drums as well. Now... select mixer channel 2 then right click at the bottom of mixer channel 1 and use the option "Sidechain to this channel", you will immediately see a vague audio cable getting connected from channel 2 to channel 1.
Then add the Fruity Limiter as an insert effect on channel 1, open the interface, and then make sure to select the compressor section (as highlighted) and enable sidechain compression by selecting the first channel. Don't get fooled here! The channel section within the Fruity Limiter does not represent any mixer channels, only the channel number(s) that got sidechained into it. So if I were to sidechain mixer channel 3 as well then it would show up as '2' within the Limiter, simply because it would be the second mixer channel that got sidechained.
The result should be obvious... we can now fully process Maschine's kick and snare drums within FLS, they can even help duck the sound of our melody a bit so that things don't stand out too much.
And this is also a great example why I came to appreciate FLS so much... in Live I'd have to set up a dedicated track for this, but within FLS I simply route my audio where I want it to go, and take things from there.
Thanks for reading, hope this was helpful for some of you!
2
Categories
- All Categories
- 21 Welcome
- 2.1K Hangout
- 86 NI News
- 1.5K Tech Talks
- 2.6K Native Access
- 14.2K Komplete
- 1.4K Komplete General
- 3.1K Komplete Kontrol
- 4K Kontakt
- 3.6K Reaktor
- 342 Battery 4
- 637 Guitar Rig & FX
- 327 Massive X & Synths
- 793 Other Software & Hardware
- 4.2K Maschine
- 5.2K Traktor
- 4.9K Traktor Software & Hardware
- Check out everything you can do
- Create an account
- See member benefits
- Answer questions
- Ask the community
- See product news
- Connect with creators